How To Take Cannabis Clones
Published :
Jan 17, 2016
Categories :
Other subjects

Cloning is the next step up to become a pro-grower. If you want to preserve the genetics of a particular plant or upsize your grow, then there’s no way around cloning.
Taking clones is not as difficult as it may sound - we are not talking about a monumental task such as cloning the next sheep. Taking cannabis clones is a rather simple process but it offers some huge advantages to the grower.
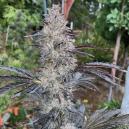
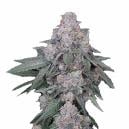
The advantages of cloning
A clone is a cutting taken from a mother plant that will carry on the extact same genetic material as the plant it comes from. When growing cannabis from seeds, there is a natural variety of phenotypes, some exhibiting more or less desirable traits. When you plant 10 seeds from the same plant or seed pack, some will grow more vigorous, others tend to take on either an indica or sativa shape, some might be more susceptible to mold, etc. Once you have an outstanding plant that shows the characteristics you’re looking for, why not keep it? That’s where cloning comes in - if you don’t clone a good plant you will lose that particular genetic expression. To keep this plant alive, you make a mother plant out of it.
A mother plant is simply a plant that is kept only to take clones from. She is never sent into a flowering period, but is rather constantly kept in a 18/6 vegetative cycle. That way, she can be kept alive for many years, producing thousands of clones. This will ensure you are getting plants with desirable and predictable growing traits, aroma, cannabinoid content and final yield. In the grow room it is a major advantage to have plants that grow uniformly, avoiding problems that arise from early or late finishers.
Some growers, particularly those adhering to organic cultivation, will not or only rarely use clones. Cannabis is an annual plant that doesn’t reproduce by clones naturally, therefore the case against clones is that they lose vigor over time. Clones can get weakly over time, and also the yield will decrease. Seed produced plants will yield more than clones, specially as time passes on. Therefore, mother plants have a limited productive period during which their clones are viable and vigorous, but as time passes on, it is better to start a fresh mother plant from seed.
How to take clones
There are more simple and complicated ways to take a clone. In essence, the easiest way is this: cut off a branch from a young plant, dip the base in rooting hormones and place the clone in soil. That’s the most basic way that will work, however, to increase chances of success, a more considerate approach can be taken.
You will need the following:
A mother plant to take the clones from
A grow-room with two separate chambers (one for vegetative growth and one for flowering)
Fine mist spray
New and clean razor (sterilize before use)
Waterproof seedling tray and tray inserts (or directly soil)
Humidity dome (preferably ones that include adjustable vents, must fit neatly onto the seedling tray)
Rooting hormone
Rooting medium
A pH tester and pH adjusters such as sold in hydroponic shops, garden centers, pet stores and pool supply shops
First of all, you will obviously need a plant to take your clones from - and it must be a female plant of course, so will have to either use feminized seeds or grow a plant until you can determine its sex. When your plant has grown up to a healthy bush with many branches it is ready for taking clones. But before you chop it into pieces, there are a few things that have to be taken into account. As soon as you have sexed the plant, switch it back to a 18/6 lighting schedule to resume vegetative growth.
Next you will have to make sure the nitrogen level in the plant is low, so stop fertilizing 5-7 days prior to taking the clones. Another step to prepare the mother plant is to spray her with water once each day before taking clones, because this will leech the immediately available nitrogen from her. This is very important for successful cloning, because if a clone has nitrogen stored in its leaves, it will use up this energy trying to develop foliage instead of roots.
Now that the mother plant has been prepared, you need to prepare the substrate (soil, rockwool, etc). Start by adjusting the pH of a bucket of water - a pH of 6.5-6.6 is perfect. Important: Do not add any nutrients to this water. Mix your substrate thoroughly with the pH adjusted water until it is evenly wet and nearly saturated - squeeze excess water out of the medium. Fill the tray inserts with the moist substrate and pack it down with medium pressure. It must be packed tight enough to hold the clone upright yet loose enough to allow for the roots to grow through it. Let the inserts sit for a few minutes to allow for excess water to run off before placing the inserts in the tray. Next, take a rod and poke holes in the medium; make them a tad wider than the clone stems. Make sure the holes don't reach all the way down to the bottom of the insert.
If you opt for Rockwool as substrate, submerge the blocks and let them soak in water with a pH of 6.0-6.5 over night. Before use, make sure all excess water has been removed from the blocks.
Next, fill your spray with the clean water adjusted to pH 6.5-6.6 - you will need it frequently from here on. For the highest success-rate you should minimize the stress for the clones - dim the light turn of the fans to avoid wind.
Your equipment should all be clean and sterile. Wash it and then use a mixture of one part household bleach to four parts tap water to spray it and then rinse with water. Have everything you need ready and within easy reach, particularly the rooting hormone, for you will need it instantly after taking the clone. And make sure your hands are cleansed thoroughly before you proceed!
The first thing to do before cutting off a part of the plant is spraying it with water yet again. Now select a firm branch that has a couple of leaf nodes and is at least 10-15cm long. Use your razor blade and trim off the leaves of one or two of the lower node points, then make a cut at a 45° angle, starting right below the lowest node you removed the leaves from. Once you have made the cut it is vital to get the clone into the rooting hormone immediately, because if the cut is exposed to air, it can cause an air embolism in the stem of the clone, causing it to die! Gel is a great choice because it coats the cut evenly and sticks to it well.
Let the freshly cut clone sit in the rooting hormone for around 20 seconds, before you gently place it into the holes in the substrate. Carefully pack the medium around the stem so it is held upright. Use your spray to mist the clones to prevent them from drying out, which would kill them at this stage. Before you place the humidity hood onto the tray, spray the clones one last time. Make sure the hood fits properly or the clones will suffer when the humidity drops below 70%. Place the tray in darkness for 12 hours to allow the clones to recover from the shock of being cut off from the mother plant.
After those 12 hours, place the tray with the clones into your grow-room and start with a lighting schedule for vegetative growth - 18 hours on/6 off. Keep the temperature between 20° and 27° Celsius and remove the humidity hood every 12 hours to spray the clones.
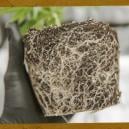
Within 10-15 days the clones will develop roots - it will be obvious to you if the clones are thriving or not, those that are not will wilt. Pull those out and discard them – they could become infested with fungus, which may then spread to your healthy clones. Keep misting the clones twice a day until you see growth or peek under the pots to check for roots after ten days or so. If the humidity levels and temperature have been ideal you may even see roots that have emerged from the node point above the medium. The clones will soon be ready to transplant then.
Once your clones have rooted, they have become normal plants and you can start feeding them according to your process. Once transplanted, the plants can be send into flowering immediately or allowed to grow to the desired size - it depends on the size of your grow-room and your preferences.